The Ultimate Homeowner DIY Lawn Aeration Guide

Step 1: Renting the Aeration Machine
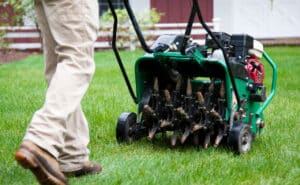
Aerating a lawn involves using a machine to pull plugs of soil from the ground, which helps alleviate compaction and allows your lawn to “breathe.” To do this effectively, you’ll need to rent a core aerator. Most homeowners don’t have one sitting in the garage, so your best bet is to rent one from a local equipment rental store.Tips for Renting an Aeration Machine:
– Call ahead: Aeration machines can be in high demand during peak lawn care seasons, so be sure to reserve one in advance.– Size matters: Make sure the aeration machine is appropriate for the size of your lawn. Larger lawns will require a wider machine to save time and effort. The other consideration is a fence gate. Make sure the machine you rent is narrow enough to fit through the gate.
– Ask for a demo: If you’ve never used an aerator before, ask the rental store staff to show you how to operate it safely and efficiently.
Step 2: Source High-Quality Grass Seed
While you may be tempted to grab a bag of grass seed from the home improvement store, resist the urge. Quality matters when it comes to overseeding, and the typical seed mix found in most big-box stores may not be the best option for your lawn’s specific needs. Here in the midwest, Central Indiana, you want to find Turf Type Tall Fescue. You can find this at specialty retailers. Make sure you know the square footage of your lawn so you buy the appropriate amount of seed. You will need 5 pounds per thousand square feet.What to Look for in Grass Seed:
– Regionally appropriate: Make sure the seed you choose is suited for the local climate in your area.– High-quality seed: Look for seed that contain a high percentage of grass types known for durability and aesthetic appeal, such as Turf Type Tall Fescue.
– Avoid cheap blends: Many cheap blends contain fillers or undesirable grass types that may not thrive in your yard. Spend a little more for high-quality seed from a specialty store or lawn care supplier.
Step 3: Calibrate the Equipment
Once you’ve rented your aeration machine and sourced high-quality grass seed, it’s important to ensure that all of your equipment is properly calibrated. This means setting up the aerator to the correct depth and adjusting any overseeding equipment to distribute the seed evenly across your lawn.How to Calibrate Your Aeration Equipment:
– Check the depth: Most core aerators have adjustable settings for how deep the plugs will be pulled. Ideally, you want to remove soil plugs that are about 2-3 inches deep.– Set the right speed: If your aerator has adjustable speed settings, choose a moderate pace to ensure thorough coverage of your entire lawn.
– Seed spreader settings: When using a seed spreader, set the dial according to the instructions on your grass seed bag. Make sure you cover the lawn evenly without wasting seed, but most importantly installing it at the proper rate per thousand. If you miss this, you will not get the results you expect.
Step 4: Prepare the Lawn and Aerate
Before you start aerating, it’s important to make sure your lawn is ready. Mow your lawn to a shorter height than usual and water it lightly the day before you plan to aerate. This will help the aerator penetrate the soil more easily.Safety First:
– Mark your irrigation heads: If you have an underground irrigation system, be sure to mark the sprinkler heads to avoid damaging them with the aeration machine.– Check for underground cables: Contact your local utility company to mark any underground cables or gas lines in your yard. Hitting one of these during aeration can cause serious damage or injury. You can do this by calling 811, a free service. The cables you need to look out for the most are invisible dog fences, landscape lighting and cable/internet lines.
After your lawn is prepped and your safety measures are in place, it’s time to start aerating. Go over your entire lawn once, and in high-traffic areas, consider making a second pass for more thorough aeration. Use a garden weasel for better results in bare areas.
Step 5: Seed and Fertilize
Once you’ve aerated the lawn, it’s time to overseed and fertilize. Spread your high-quality grass seed evenly across your lawn, making sure to cover bare spots thoroughly. Afterward, apply a slow-release fertilizer to give your new grass the nutrients it needs to grow strong. DO NOT PUT DOWN ANY WEED CONTROL AFTERWARDS.Tips for Seeding and Fertilizing:
– Water lightly: After seeding, water the lawn lightly to help the seed settle into the soil, but don’t soak it.– Keep it moist: Continue to water your lawn daily, keeping the soil consistently moist for the first couple of weeks until the new grass starts to sprout.
Step 6: Transporting Equipment
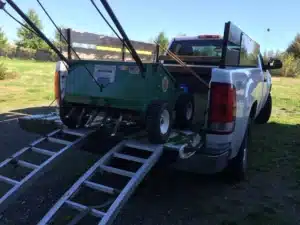
Transporting an aeration machine can be one of the most challenging parts of a DIY aeration project. These machines are heavy and bulky, often requiring a truck or trailer for transport. If you don’t have a suitable vehicle, you may need to rent one along with the aerator or arrange for delivery.
Tips for Transporting an Aerator:
– Enlist help: Due to the weight of the machine, it’s a good idea to have a friend or family member help you load and unload it.– Use ramps: If possible, use ramps to roll the aerator in and out of the vehicle, as lifting it can be difficult and dangerous.
Is DIY Aeration Worth It?
While DIY lawn aeration can save you money, it also requires a lot of time, effort, and logistical planning. Between renting equipment, sourcing high-quality seed, calibrating machines, and making sure no underground utilities are damaged, the process can be overwhelming for the average homeowner.If all of this sounds like more work than you bargained for, don’t worry! The pros at Blue Duck Lawn Care handle lawn aeration all day, every day in the fall. We have the expertise, equipment, and high-quality products to get your lawn looking its best without the hassle. Call us today at 317-748-3153 and let us take care of the hard work for you! You can also find us online at www.BlueDuckLawnCare.com